There’s nothing wrong with slowing down and taking your time. I love to meditate and try to be in the now when I eat or go for a walk. But even if you’re patient and enjoy taking life slowly, your web site should be like greased lightning.
Here’s why:
- Mobile devices
- User abandonment
- Google ranking
Let’s cover each one in turn.
Mobile Devices
Smart phones are an extremely popular way to browse the web, but data plans often have slow speeds. Plus, a smartphone isn’t as powerful as a desktop. Less is more for mobile users. They want the information on your site, but won’t sit around waiting for it to load.
If you have a mobile phone, make sure to take your web site for a spin to test it out. The site should load within a few seconds.
User Abandonment
If your site takes over 5 seconds to load, studies show that more than 1 in 4 users will leave. And they’re probably not coming back.
I would bet you’re been one of those people when you go to a slow site. There are a lot of web sites out there. If yours doesn’t give users the information they’re looking for, they’ll get it elsewhere.
Google ranking
Google has said that their search engine rankings will be influenced by how quickly your site loads, especially for mobile search results. I’ve read several articles that tried to quantify the impact, but they weren’t conclusive. The results mostly show that it’s not a major factor yet.
One thing they did find is if you can reduce your load time from 10 seconds to 3 seconds, it could have a big impact on your ranking. Going from 3 seconds to 1 1⁄2 seconds, not so much.
Method #1: Choose Appropriate Image Sizes
When you visit a site and an image loads really slowly and you can see it progressing from top to bottom, chances are it’s larger than it needs to be. How do you know what size to make your images?
First I need to define some terminology. The size of an image can mean one of two things:
- Dimensions
- File size
Dimensions
The dimensions are how large the image actually is, in pixels. For example, the dimensions of the gray box below is 300 x 200. This means it’s 300 pixels wide and 200 pixels high.
A common mistake is to upload a digital photograph to a web site without changing the dimensions. When people do this and see how huge it is on the page, they’ll often use the HTML width and height to make the image appear smaller. But this doesn’t change the actual dimensions of the image.
It forces the browser to download a large image only to make it appear smaller on the screen. Instead, change the actual dimensions of the image to match the size you want it displayed.
For example, the image below is actually 3000 x 2000 pixels, but I’ve set the width and height to make it look like it’s only 300 x 200. But it’s a lie! Click on the image to see it in all its monstrosity. (If your mouse cursor turns into a magnifying glass with a plus when you hover over the larger image, click on that image to see the actual size. The image will be larger than your screen).
If you use Wordpress to upload your images, there’s good news. Wordpress automatically resizes images to a few different dimensions. Just pick one of these resized versions and you’re set.
If you’re not using Wordpress, there are dozens of free image editing tools. I use FastStone Image Viewer. Or you can use an online service like PiceResize.
File size
The other way to measure the size of an image is the file size, or the space it takes up on your hard drive. This size is measured in bytes (or kilobytes, megabytes. If your web images are measured in gigabytes you’re doing something terribly wrong!)
File sizes can be confusing. The file size can differ dramatically between two images when they appear identical.
For instance, take a look at these two photos of my son at the pond. They have the exact same dimensions (200 x 443), but can you tell which one has a smaller file size?
 |
 |
The image on the left is 107 kilobytes. The right one is only 25 kilobytes. In other words, the right image is 76% smaller, but you can hardly tell the difference.
How is it so much smaller? Image optimization. Whenever you use images on your web site, optimize them. I use RIOT, which optimizes both JPEGs and PNGs. You can use an online service too like Web Resizer.
Method #2: Use the Right Image Type
The vast majority of your images will be one of two file types:
- JPEG - photographs
- PNG - most everything else
The rule of thumb is to use a JPEG for photos and a PNG for logos, screenshots, illustrations or when you need a transparent background.
A local pizza place used a PNG for a photograph of their pizza. Try going to the site and watch how slowly the pizza image loads.
It’s a whopping 1.23 megabytes or 1,230 kilobytes. That’s larger than entire web sites. As a result, their site loads painfully slowly even with my zippy internet connection and even slower on my phone.
Converting the pizza image to a JPEG reduced the file size to a mere 194 kilobytes. That’s 84% smaller than the PNG!
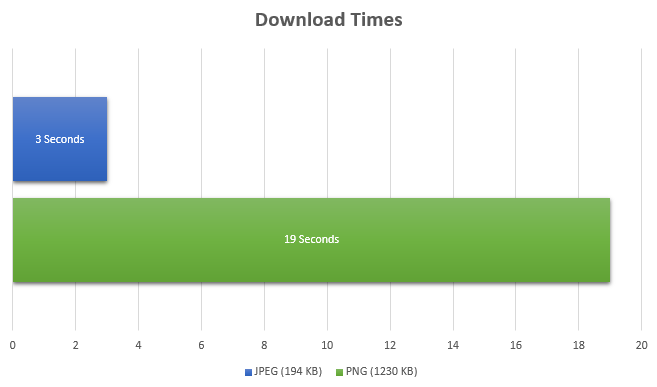
Measured another way, on a mediocre 3G connection, downloading the smaller image would only take about 3 seconds. The original image would take 19 seconds.
Conclusion
To recap, these two simple methods can make a big difference to your visitors.
First, use the right size images. Resize image dimensions to what you’re going to use on the page and don’t change the dimensions with just HTML. Always optimize your images for the web.
Second, choose JPEGs and PNGs appropriately. When in doubt, save the image as both types and use the smaller-sized image as long as it looks good.